Saturday, January 7, 2023

Use the Philips Hue motion sensor to monitor temperature...

I was looking through the Philips Hue API to see how to interact with the Philips Hue motion sensor, and I was happy to find that the motion sensor includes a temperature sensor.

The temperature sensor will show up in the list of sensors once you add the motion sensor to your Philips Hue Hub.

Here is an example of the response data for the temperature sensor (but only showing one sensor instead of all sensors):

curl http://$HUE_BRIDGE_IP/api/$HUE_USERNAME/sensors

{
    "5": {
     "state": {
     "temperature": 1929,
    "lastupdated": "2023-01-06T16:24:41"
     },
     "swupdate": {
     "state": "noupdates",
    "lastinstall": "2023-01-04T01:35:43"
    },
     "config": {
     "on": true,
     "battery": 100,
    "reachable": true,
    "alert": "none",
     "ledindication": false,
     "usertest": false,
    "pending": []
     },
     "name": "Hue temperature sensor",
     "type": "ZLLTemperature",
     "modelid": "SML003",
     "manufacturername": "Signify Netherlands B.V.",
     "productname": "Hue temperature sensor",
     "swversion": "2.53.6",
     "uniqueid": "00:11:22:33:bb:00:ee:33-22-4444",
     "capabilities": {
     "certified": true,
     "primary": false
    }
    }
}

The temperature value of "1929" converts to 66.72 degrees Fahrenheit.

Here is an example python app that will watch and print out the temperature value returned from the temperature sensor in the Philips Hue motion sensor.

The example app will monitor the temperature sensor, and print out the temperature for each sensor you ask to monitor via a comma separated string of sensor IDs you can pass in on the command line.

I have two motion sensors - one in the garage and one in a room in the house.

The following is the command line I used. Note that I used a comma separated string for the two temperature sensors, and set the monitoring interval to run every 10 seconds:

python3 main.py -b $HUE_BRIDGE_IP -u $HUE_USERNAME -s 5,18 -i 10


Here is an example of the output:

Temp is unchanged. Temp: 55.42

Temp is unchanged. Temp: 66.72

Temp is unchanged. Temp: 55.42

Temp changed! Temp: 67.17


Example app in Github: https://github.com/leewallen/motion-sensor

Friday, December 30, 2022

Playing around with Philips Hue lights from the command line...

We own a bunch of Philips Hue light bulbs now, and we just bought some as a gift for one of our kids. You can use the Philips Hue app on your computer and/or mobile device, but it's also a lot of fun to play with the lights (and other Philips Hue devices) from a terminal or an app that you can write for yourself using the Philips Hue API. 

Register to get access to the Developer's API documentation

You can find the Philips Hue Developer documentation here: https://developers.meethue.com/

The Developer page has a login link. Click the Login link, and then select the Register option at the bottom of the Login form. Or, use this link to get to the Register page.


Find your Hue bridge IP address

Follow the instructions listed here to find the IP address of your Hue bridge.

The easiest method for finding your Hue bridge IP address is to make sure you're connected to the same network that the Hue bridge is connected to and then visit this address: https://discovery.meethue.com/

The response will look something like this:

[
  {
    "id": "112233aabb44cc55",
    "internalipaddress": "10.0.0.1",
    "port": 443
  }
]


Use curl to send HTTP requests

You can use curl to send requests to the Hue bridge.

If you're new to using curl, then watch this short video about curl for sending HTTP requests to a server. In our case, the server will be the Philips Hue Hub using its IP address. We'll pretend that the IP address of the Hue bridge is 10.0.0.1 for the examples.


Go to the Hue API docs

After registering/logging in on the Philips Hue Developer page select the Develop menu and then select the Hue API menu item. 


Create a username

The Hue API requires a username. The username is created and saved by your Philips Hue bridge, and the hub adds the username to a list of usernames that are allowed to send API calls to the Hue bridge.

Follow the instructions here to create a username.


Use curl to get light info from the bridge

  1. Open a terminal
  2. Set a variable in your terminal that will hold the Hue Bridge IP address you retrieved above. For example, if your Hue bridge IP address is 10.0.0.1, then you would enter the following:

    HUE_BRIDGE=10.0.0.1

  3. Set a variable in your terminal that will hold Hue username you retrieved above. For example, if your assigned username is nE1wnTaC00ki3, then you would enter:

    HUE_USERNAME=nE1wnTaC00ki3

  4. Send a curl command to your Hue bridge to get info about all of the lights you currently have associated with your bridge:

    curl -XGET http://$HUE_BRIDGE/api/$HUE_USERNAME/lights

You should get a response that is a JSON string containing information about all of your Hue lights.


Tuesday, February 9, 2021

Use Jupyter Lab with PySpark and S3

If you're having an issue accessing S3 data from JupyterLab, then read on! Perhaps the info here, or in the linked GitHub repo, might help you discover and resolve your issue.

Before I get into any of the details, feel free to use this GitHub repo as an example of how to configure your JupyterLab PySpark notebook (running in a docker container on your local machine) to access data in S3.

I was recently wanting to use JupyterLab to view some parquet data in S3. I chose the pyspark-notebook image from the Jupyter Docker Stacks repo as a base Docker image and added jar files that would allow Spark to connect and read/write data to S3. 

It seemed like it should be pretty easy and technically it was. However, I ended up getting 403 errors when the pyspark code would try to read data from S3. The reason for the 403 error was understandable when I realized what I had done, but I didn't find any posts or documentation that illustrated my exact problem, so I figured I would share it here.

I wasn't setting the credentials provider explicitly when configuring the Spark session. I had passed in temporary credentials as environment variables when running the a script to start the Jupyter Lab container. I retrieved the credentials by using the following command:

aws --profile <your aws profile name> --region us-west-2 sts get-session-token

The default credentials provider was being used because I didn't explicitly set a credential provider to use. I assume that the access key and session key had info tying them to a session so the default credentials provider received an error when attempting to connect since no session token would have been passed to AWS. 

Here is the documentation from Hadoop where it shows the property names and values to use when configuring Spark to access data from S3. It's what I read and realized that I needed to set the credentials provider explicitly. 

The Hadoop documentation also reminded me that you don't need to explicitly set the access key, secret key, and session token in the Spark session configuration if you use the standard AWS environment variable names. It makes sense - I just had been explicitly setting the credentials previously.

You can view a GitHub repo that includes a Dockerfile, run script to start the docker container that passes the AWS credentials as environment variables, and an example JupyterLab notebook that uses pyspark to connect to S3 and download data. The bucket referenced in the example is private, so you'll need to substitute the S3 URI to a URI that points to publicly available data or use a bucket that you have permission to access and read. 

If you're interested in the data I used then you can find it here: the CDC's COVID-19 dataset.


Good luck, and have fun Sparking!

Monday, January 4, 2021

Notes from installing K3s on my Raspberry Pi cluster...

I put a Raspberry Pi cluster together  - now what should I do?

I have a problem when it comes to Raspberry Pis. Actually, I have a problem with impulsivity, but I'll pretend that the issue is exclusive to Raspberry Pis. The great thing is that the cost of the various Raspberry Pi models is low enough that it's relatively cheap to build a cluster. 

I knew I wanted to do the following:

  • Learn more about Kubernetes without using work resources.
  • Try some of the very neat open source projects that are mentioned on the Kubernetes podcast (ie, OpenFaas, MinIO, etc).
  • Play around with some DIY home automation. I'm not completely sure what I want to do yet, but I have a bunch of Philips Hue lights that are begging to be controlled from the cluster.

I did a search for "Raspberry Pi cluster" and "Kubernetes", and found Jeff Geerling's Raspberry Pi Cluster Ep 2 - Setting up the Cluster YouTube video.

Jeff's Kubernetes and Raspberry Pi videos are packed with useful information and he communicates very clearly. Definitely check them out!

I mostly followed his related blog post when I went to install K3s on my cluster. The K3s site has great information as well, and the install steps (all two of them) are very simple to follow. 

However, I ran into an issue or two when I was first setting up the cluster, so I took some notes that I'm providing here. 


Initial OS Selection and Setup


I used Raspberry Pi OS Lite from the Raspberry Pi OS Download page.

Jeff's blog post lists steps for how to copy the Raspberry Pi OS image onto the SD cards, so I'll leave those steps out. However, before I unmounted the SD card I copied the following text to the /boot/cmdline.txt file:

cgroup_enable=cpuset cgroup_memory=1 cgroup_enable=memory


On First Boot


I made the following changes on first boot of each image:

  1. Changed the password
  2. sudo apt-get update && sudo apt-get upgrade -y && sudo apt-get install -y vim
  3. Set the hostname. I named my Raspberry Pis so they matched my network cable colors, so I ran a command similar to this: echo -e "green" | sudo tee /etc/hostname
  4. Set locale, timezone, and WLAN channel country via raspi-config
  5. Updated raspi-config
  6. Changed memory available to the GPU to 16 MB (A3 Memory Split)
  7. Expanded the file system to max size available

There is (or was) an issue with Raspberry Pi OS Lite (Raspbian Buster) from a recent update, and the cgroup info that is added to /boot/cmdline.txt was being ignored. The work-around is to run a raspberry pi update.

sudo PRUNE_MODULES=1 RPI_REBOOT=1 SKIP_WARNING=1 rpi-update

Before Installing K3s

There is a section on rancher.com where it shows that if you are using Raspian Buster (which is Raspberry Pi OS Lite) then you should enable legacy iptables:

sudo iptables -F
sudo update-alternatives --set iptables /usr/sbin/iptables-legacy
sudo update-alternatives --set ip6tables /usr/sbin/ip6tables-legacy
sudo reboot

I ran the following on each of the Raspberry Pis:

echo -e "10.0.1.1\twhite" | sudo tee -a /etc/hosts
echo -e "10.0.1.2\tred"   | sudo tee -a /etc/hosts
echo -e "10.0.1.3\tgreen" | sudo tee -a /etc/hosts
echo -e "10.0.1.4\tblue"  | sudo tee -a /etc/hosts
echo -e "10.0.1.5\tblack" | sudo tee -a /etc/hosts

Installing K3s

SERVER INSTALL

This will tell the installer that it is a server because the K3S_URL wasn’t set:

curl -sfL https://get.k3s.io | K3S_KUBECONFIG_MODE="644" sh -s -
AGENT INSTALL

Get the token from the leader node and trigger the download and execution of the install script. The first Pi in the cluster has a white network cable, so I arbitrarily chose it as the leader node. I ran the following on each of the follower nodes.

export TOKEN=`ssh -t pi@white sudo cat /var/lib/rancher/k3s/server/node-token`
curl -sfL https://get.k3s.io | K3S_URL=https://10.0.1.1:6443 K3S_TOKEN=$TOKEN sh -

Test the Cluster

If you haven’t already installed kubectl, then install it now.

Copy the /etc/rancher/k3s/k3s.yaml file from the leader node of your Raspberry Pi cluster, to ~/.kube/config on whatever computer you plan on using to access the cluster. The location might be different on a Windows machine, but that would most likely be the correct path if you’re using the bash shell.

scp pi@white:/etc/rancher/k3s/k3s.yaml ~/.kube/config

Now run kubectl get pods —all-namespaces and see that the cluster already has pods running on the nodes.

Let's Run Something!

I found Alex Ellis's blog post called "Will it cluster?" and followed his instructions for installing OpenFaas. It seems funny now because I had no idea who Alex Ellis was at the time. I only tried OpenFaas because of the "Will it cluster?" blog post. 

I installed OpenFaas, copied the service and deployment yaml files Alex provided in the "Will it cluster?" post, and was able to use the Figlet application in just a few minutes. Very neat stuff!

I recommend going to the OpenFaas.com site to learn more about using OpenFaas. 

This example shows that sending text to one of the nodes in the cluster (it doesn't matter which node you pick) will run the figlet function - a function that converts your text data into an ASCII art version of the text.

> echo -n "Hello" | curl --data-binary @- http://red:31111
 _   _      _ _
| | | | ___| | | ___
| |_| |/ _ \ | |/ _ \
|  _  |  __/ | | (_) |
|_| |_|\___|_|_|\___/

Sunday, August 23, 2020

K3s Raspberry Pi 4 Cluster

Do you have an interest in Raspberry Pis and cluster computing? Me too! 


Parts


One thing that I have enjoyed about building the Raspberry Pi cluster is that it's inexpensive to build up over time. 

I bought the Raspberry Pis and the PoE hats from Canakit, and everything else was bought from Amazon. Amazon had higher prices for the Raspberry Pi PoE hat, and didn't have a Raspberry Pi 4B 8GB board available when I first started buying the parts. 


Here is a list of what I bought for the cluster. 

Part My Choice Qty Links
Case Cloudlet Cluster Case 1 Amazon
Raspberry Pis RPi 4B+ 8GB 5 Canakit
Amazon
PoE Hats Raspberry Pi PoE HAT 5 Canakit
Amazon
SD Cards SanDisk 128GB microSDXC 5 Amazon
Network Switch  TP-Link 8 Port PoE Switch  1 Amazon
Network Cables Cat7 1FT Multi-Color 1 x 5pk  Amazon

Case


I used the Cloudlet Cluster Case by C4Labs.

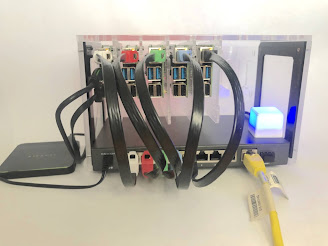
Very tiny, but fulfilling, RPi cluster.


It practically hums like the WOPR!


I found the case by searching on Amazon for "Raspberry Pi Cluster Case', and the Cloudlet Cluster Case was the first result I saw that I really liked. I like the look of the stackable cases, but the Cloudlet Cluster Case reminded me of a very tiny computer rack - it felt right.

The case has mounting boards and hardware for 8 Raspberry Pis. You mount the Raspberry Pi onto the acrylic board, and then the mounting board easily snaps into the case. 

This is great for allowing you to start very small and expand as you would like. The price might seem like a considerable jump from the stackable case options but I still picked the Cloudlet Cluster Case because I think it looks nice, it's very sturdy, and had enough room for the network switch. 

You can also see a blue square in the image above - that's the Blinkstick Square with an enclosure. I plan to set up monitoring for the cluster, and for a variety of webhooks, and use the Blinkstick Square for showing status. I figured I would use white, red, green, blue, and purple to indicate which Pi/Node the status was for. 

 Raspberry Pis


Originally I was going to build a cluster from a couple old Raspberry Pis I have that I hadn't been using, but I bought a Raspberry Pi 4 bundle for my daughter and the performance is so good that I decided to get the newer Pis instead. 

I would have liked to have bought the Raspberry Pis from Amazon, because I appreciate the customer service you get from Amazon. However, I have had great luck with smaller businesses that sell Raspberry Pi products, and usually they have better prices than what you would good from Amazon. Canakit had Raspberry Pi 4B 8GB boards available before Amazon, and the price is about $15 cheaper. Vilros and the PiShop also had Raspberry Pi 4B 8GB boards listed, but had the same price as Canakit.

PoE Hats


I found a few PoE hat options, but I went for the official Raspberry Pi PoE hat

The price was better than most options, and I assumed there would be more testing around the official option. Also, one PoE hat that I looked at seemed to have a nicer profile but the seller suggests buying a fan for it. The official Raspberry Pi PoE hats come with fans attached and there is no issues with clearance in the Cloudlet Case. 


SD Cards


I bought 128 GB SD cards for each of the Pis. I didn't need SD cards that hold that much data because I can attach an external HDDs or SSDs to add storage. If I were to do this again, then I think I would buy smaller SD cards, and use the saved money to go towards external drives.


Network Switch


I bought an 8 port PoE switch from TPLink mainly because it was the cheaper option between it and a Netgear 8 port PoE switch. The TPLink switch is $30 cheaper than the Netgear equivalent. I had no problems at all - it works great with the Raspberry Pi PoE hats. There were no special configurations for the Raspberry Pi, no jumper settings for the PoE hat, and nothing to configure for the switch. Just connect all the things.


There will be a post coming soon that will list the steps I took to set up the Raspberry Pis and get K3s installed. It was relatively simple, but not completely hassle-free. The first time I was able to see that all nodes were running and available to the cluster made it worth it. 

Saturday, August 22, 2020

Welcome to 2020! Err...I mean, welcome to August 2020!

I love home projects where the main purpose is to learn something new. The only projects I love more are the next learning projects.

Here are some areas I want to learn more about:
  • Kubernetes
  • Tracking useful metrics
  • For the near future:
    • Serverless for Kubernetes
    • Load testing at a small scale
    • Data pipelines

Some of the items are very easy to explore at work but not all of them, so I plan to focus on projects that are not work specific.

Kubernetes


You might ask, "Who isn't using Kubernetes?"

Well, I wasn't until recently!

It's been really fun. There are so many open-source projects that I want to use that will easily run on Kubernetes that it's almost hard to force myself to start at the beginning and learn how to set up and manage a cluster. Or even a tiny cluster - but that's what I'll do first!

I had wanted to make a Raspberry Pi cluster for a while and this provided the excuse. I bought some Raspberry Pis, a nice case, an unmanaged switch that had 8 PoE ports, PoE hats for the Raspberry Pis, SD cards, and network cables. I put the Pis in the case, installed k3s (Lightweight Kubernetes), and now I just need some projects to help provide areas to start digging!

I'll share the steps I followed, parts I used for putting the cluster together, and anything I might do differently if I were to start over in the near future.

Tracking Useful Metrics


One of my first plans for the cluster will be to add metric tracking. I'm not sure what metric tracking options there are, so I searched to find out what other people are using. I found a number of references to this cluster-monitoring repo, and it looks like the setup for k3s is very simple. I forked and cloned that repo, followed the quick start info for k3s (updated some configs), and Prometheus, AlertManager, and Grafana were soon available and showing some useful metrics!

I'll create a post about what I learn with monitoring in the near future. 

Recommendations:


Following the Quickstart for K3s from the carlosedp/cluster-monitoring repo was very straightforward, and it would be my suggested monitoring choice to anyone setting up a Raspberry Pi based Kubernetes cluster. I might change my mind, but for now it seems like an easy and quick way to go.

For now I suggest forking the repo, and then push any changes you make to vars.jsonnet to your cluster-monitoring repo. That way you can add/remove monitoring for your cluster quickly using a script that clones your repo first.

Near Future Projects


There are a number of things that I want to explore at home:
  • Serverless options for Kubernetes (for example, OpenFaaS, KNative, and Kubeless)
  • Load testing at a small scale (for example, run load tests against a single service as part of a CI pipeline, or run a set of load tests against a smaller version of your production environment)
  • Explore a variety of data pipelines


Saturday, December 21, 2019

Taco Cat Goat Cheese Pizza - A great family game!

Taco Cat Goat Cheese Pizza!

Now say that 5 times really fast. It's hard to say. Now imagine having to say "Taco" "Cat" "Goat" "Cheese" "Pizza" in turn while laying down pictures of things that don't match the words. Then imagine having to slap your hand down on the card if the word you say matches the card. It's really difficult but fun!

Then add narwhals, groundhogs, and gorillas to the mix.


That's what you get with the game Taco Cat Goat Cheese Pizza


Fun and sore hands. And lots of laughter!
I bought this game a while ago but we only recently played it. It was surprising how much fun we had within the first round of playing it. We can hardly wait to play it again!

The suggested age is 8 years and up, but if you have a child that can read fairly well, then it is probably fine for younger ages. It was definitely no problem for our 7-year-old daughter. She did much better than I did!